Magical Fairy Cake
Every year my beautiful niece has her birthday. My job, as Aunt who decorates cakes, is to provide a cake for the annual celebration, if requested. This year it was requested. I received the text message two weeks out from the party date. A fairy cake was required. The brief was simple: the birthday girl likes chocolate and her favourite colour is blue.
With only two weeks to design and make the cake I was limited in my options. I have been very keen on trying my hand at unicorn style cakes and quickly found a reference photo and video of what I would like to make and sent it to my sister. The design was approved immediately. And I also immediately forgot that the original cake designers The Scran Line made a reference video and instructions of how to make this cake.
Starting from scratch and with a vague memory of the design reference I set about making my next masterpiece. I chose my basic vanilla flavoured Utility Cake (ugh such a captivating name) and prepared two 7” round cake tins. I am a big fan of the butter and baking paper lining method but you do what works for you.


I pulled out three similar sized bowls. By chance they were all Tupperware and shades of purple and I am unsure what this says about me. I selected my three cake batter colours Raspberry Paste Colour by Creative; Violet Concentrated Paste by Wilton and Turquoise Soft Gel Paste by AmeriColor. I find it a bit of a mystery as to how much colour should be used to tint cake batter, but I would guess what I put in equalled about 1/4 teaspoon of each colour - noting that some brands have a stronger pigment. If you add the colour a bit at a time you quickly get a sense of how much you need. Just don’t stop to ask yourself how much food colour you should be giving the children.
The next trick is to mix the colour all the way through the batter but NOT over beat the batter and loose the fluffiness. Just be gentle with your colour mixing. I used a 1/4 cup to scoop the colours randomly into the tins. It was messy and I have no regrets about licking my fingers clean afterwards.


Once the cakes were baked and cooled I wrapped them tightly in two layers of glad wrap for the freezer. I like to freeze my cakes before preparing them. It means I can bake well ahead of the party without fear of a last minute meltdown.
In the meanwhile, I prepared my buttercream frosting and used the same colours as the batter. I mixed a teaspoon of musk flavour into the pink because I really wanted the cake to have a delicious but subtle flavour. And I just love musk flavoured icing. You ask for a free cake and I get to make the important decisions - that’s the deal.
I used my trusty cake slicer (only every broken once) to cut three layers of each cake until I had five thin disks of cake and then commenced assembly. To try and make my layers of filling vaguely similar I used a piping bag with a wide piping tip and piped very badly before smoothing with a spatula. Once all the layers were assembled I chilled it in the fridge so the layers wouldn’t slide around when I coated the outside. Once chilled I commenced my ‘crumb coat’ which is just a fancy-pants way of saying a ‘really crappy first layer of frosting’. It was now quite late at night so I toodled off to bed.


The next night I got back to work and using a spatula I smeared the assorted colours across the outside of the cake and smoothed it with my smoothing doodad and put the cake back in to chill.
For the dripping chocolate I put 140g dark chocolate in a small bowl and added 130g of near boiling cream to make a nice runny ganache. To be honest it was probably too runny but it did the job. I had tried googling ‘Katherine Sabbath drip cake ganache’ (cause Katherine is the genius who bought us drip cakes) but I couldn’t find anything that was satisfactory ( remember that I forgot about The Scran Line’s video tutorial for this exact cake!!). Using a small teaspoon I spooned the ganache all around the edge, pushing it over the lip as my heart desired. I chilled the cake once more while I prepared the gold cake dust with cake decorating rose water. This was then hand painted onto the drips.

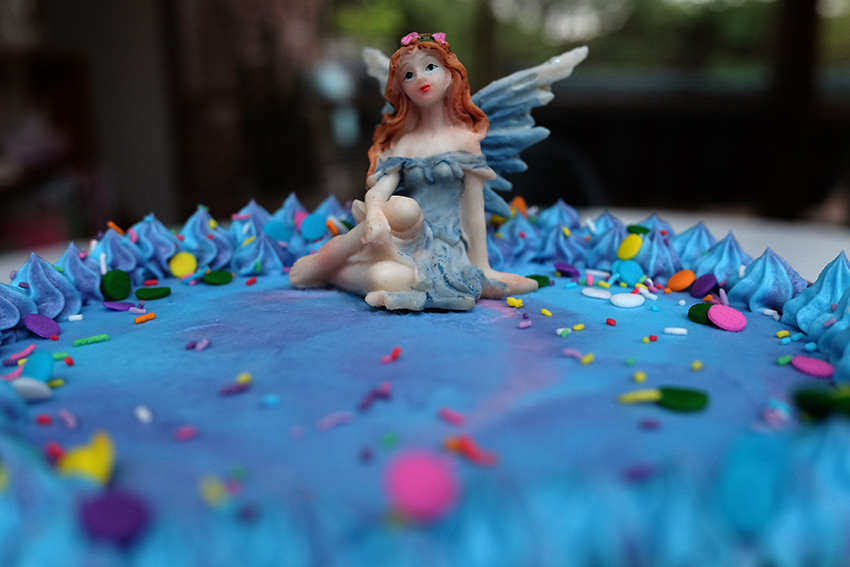
By this stage the buttercream had re-softened which was a good time to pipe the boarders and start throwing the edible decorating at the cake. And when I saw throwing, i mean literally throwing small pinches of decorations at the cake.
I purchased the fairy from Arthur Daley’s for around $5.00 and stuck her on top.
The Magical Fairy Cake
I was pretty darn chuffed with myself. And all reports from the party were that the kids, and adults, loved it!


