1970s Vintage dress pattern
It has been a good few years since I have sewn anything more complex than a sack dress. Blame it on the big America trip planning back in 2019, blame it on the pregnancy anxiety, certainly blame it on the pandemic and the actual baby. I just have not had the time, mental energy or space to sew. But in the past few weeks I started to find myself again, I painfully carved out time and I pushed my ‘work from home’ tech to the side of the dining table and committed to finishing a dress.
I decided to complete the dress that I cut out in November 2019. I cut this dress out shortly after we returned from the big USA trip fairly broke, and when I was in the midst of finding out I was pregnant. And nothing about this dress has been easy. Let's go right back to the beginning and see why this medium skill level dress has been probably the second most complex item I have attempted (the MOST complicated was this Beauxbaton costume).
The pattern and the toile (2019)
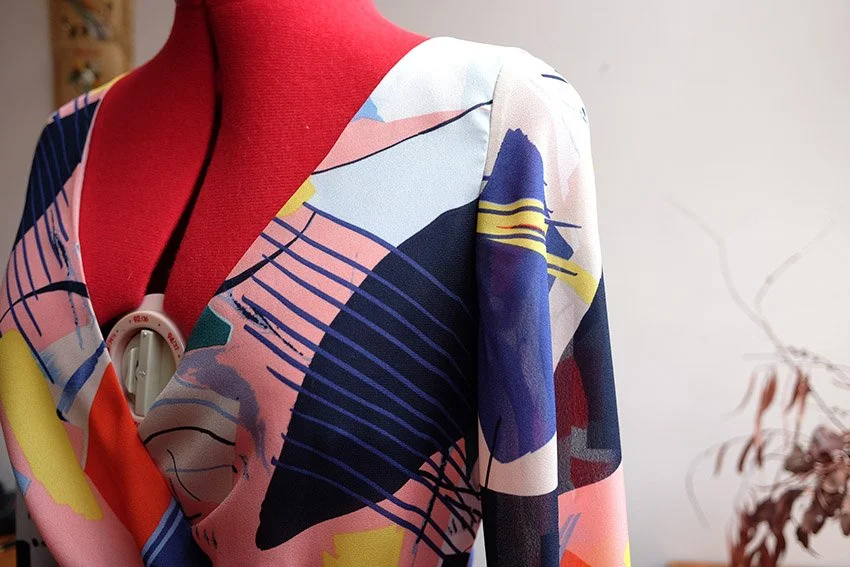
Simplicity 8013, 1970s Vintage Pattern. I bought the pattern during a sale. I knew it was a fancy dress that I would probably just make the once, if ever. I was seduced by the flowy and full skirt length. The bell sleeves had me worried but I felt this was a pattern worth investigating.
I rarely think to sew a toile but a few things concerned me with approaching this dress. Firstly, this dress uses A LOT of fabric. About 10m. Even with a cheaper fabric it could cost a minimum of $100. That is not a volume of fabric or cash you want to waste.
This pattern has a lined and crossed over front. This is only the second lined dress I have attempted but given how sheer this fabric is, I wanted to make sure it wasn't going to be bulky. As any person with breasts may know, a cross over front can offer VARIOUS levels of coverage. These days I'm looking for a decent amount of coverage for my décolletage. I want to feel comfortable in the dress and not like I'm going to pop a lady put on the D' floor.
I made the toile, minus the zip, in the size 10 and was able to assess where I needed to loosen out the pattern to a size 12 for a better fit. I did NOT make a second toile. Let's not get carried away doing too much prep.


The fabric and cutting (2019)
I had purchased about six meters of the fabric back when I didn't know what I was going to make with it. Those six meters were coming up short and I was now facing the problem of finding more.
I went back to Spotlight with a sample of the fabric and tried to find it on the shelves. No luck. I asked the staff. No luck. But she did give me a clue. It was either Crepe or Georgette (check out this amazing guide to the different fabrics by Sew Guide). And the assistant at Spotlight was leaning towards Georgette. I was advised to go home and search Georgette in the Spotlight website and scroll through to see if I could match the pattern. It didn't feel hopeful but it was, somehow, successful. I ordered the required additional metres online and waited oh so long for it to be delivered (and this was PRE-pandemic postal speeds).
With my adjusted pattern I began to lay it on the fabric and begin cutting it out. Being Georgette it was slippery AF to cut. I tend to use a rotary wheel and cutting matt so I spent a lot of time trying to pin, lift, roll, and cut without stretching or distorting the fabric. It wasn't fun. I went back and forth between scissors and rotary wheel cursing both. As I cut out each section, I dropped it over the bannister rail and there it stayed for several months until eventually it was folded up and relegated to the ‘ongoing projects’ cupboard. As it turns out pre-natal anxiety and depression saps your motivation. I was pregnant with my rainbow baby, at the beginning of a pandemic and facing an uncertain future, and I had all the feels. Also, I knew my body was about to change so was there even any point sewing the dress now. With the pattern pieces put aside in the craft cupboard as I focussed my energy on the biggest craft project of my life - growing a baby and becoming a mum to a living child.

Hot Vaxxed Summer (2021)
Cut to Summer 2021/22, a full two years after I had put aside the dress - I emerged from the fog of anxiety and new mum overwhelm. I now have the universal level of anxiety and a regular amount of mum life overwhelm. But I wanted to finish the dress. It was a lot of fabric to waste and it took a lot of time to cut out. My biggest concern now was that I had put on a few kilos since I cut out the adjusted pattern. There wasn’t much to do but start sewing and hope that it fit. As the tightest and most worrying measurement was around my bust and waist I decided to reduce the seam allowance from 1.5cm down to about 0.7cm. I didn’t know what flow on effects this might have to the pre-cut fabric or the fit so I just closed my eyes and hoped for the best.
The Highs and Lows (2022)
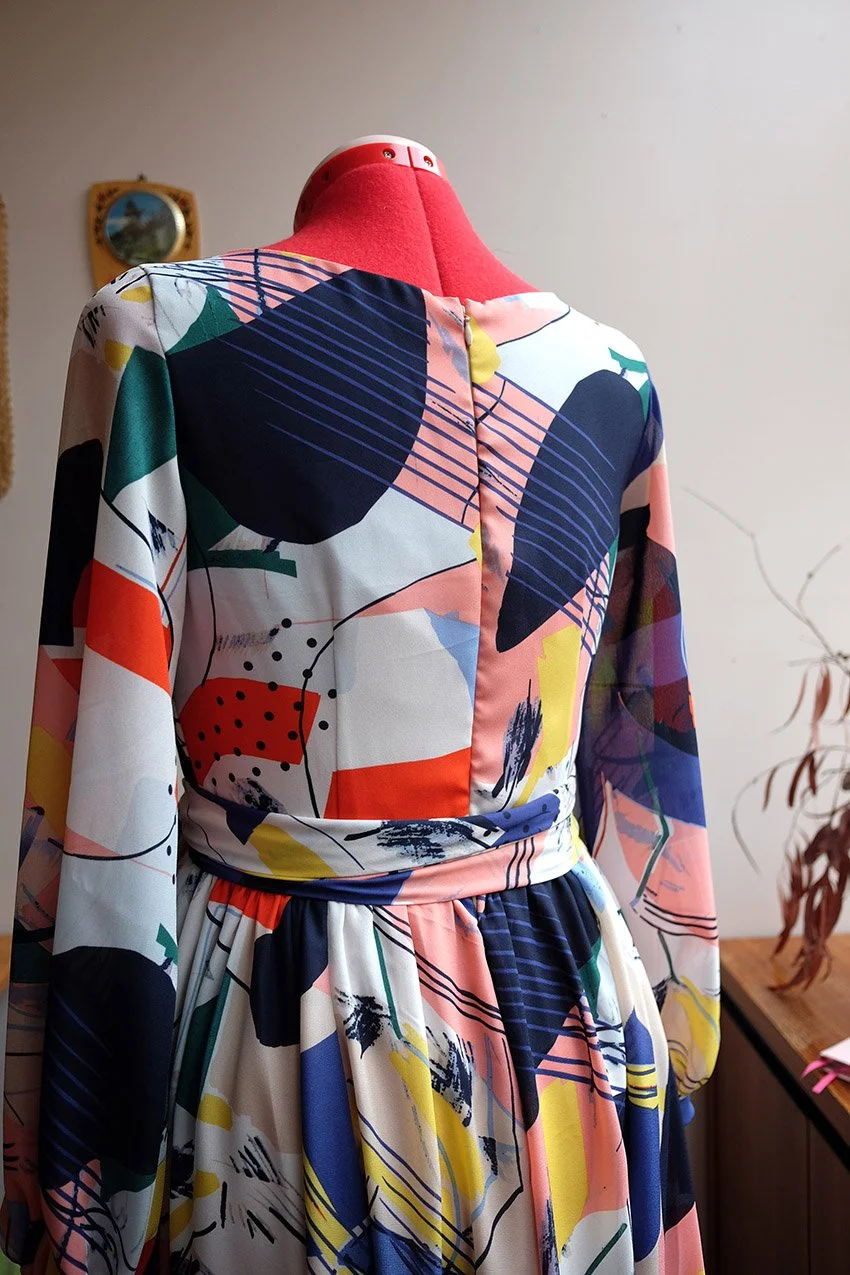
The pattern is pretty straight forward to sew - thankfully. The toile served as a reminder for the slightly tricky lining and bust cross over but everything after that was easy as peasy. This dress will help you become very proficient at gathering. I used a walking foot for the whole dress - other than the zip. The invisible zip went in like a dream thanks in most part to my invisible zipper foot. The cuffs I altered so they were double width. They feel much more luxurious this way. I bought a Birch Fabric Button kit and made my first every fabric buttons and then promptly had to learn how to make a thread loop. I found this You Tube tutorial by Erica Bunker was the easiest to follow. I don’t have an over-locker so I did have to zip-zag stitch the fabric edges in the seams to stop the fraying. Oh how Georgette does fray. I also machine finished the sash as I couldn’t be bothered hand slip stitching. You honestly cannot even see it once the sash is on. All that was left was to hem the full skirt and the lining skirt. groan. Oh, and while I was waiting to do the hem - I got an OVERLOCKER! My aunty sold her one to me dirt cheap and my partner bought it for my Christmas present. I ended up going over most of my zigzag seams with the overlocker and it was just a delight.


The Hem (2022)
Hemming this dress was going to be a challenge. I never know want length I want something to because I want it to be the right length for all the different heights of shoes. I also wasn’t sure how to hem the dress in an easy, fast and appropriate manner that would retain the floaty feel of the dress. So I left the dress on the mannequin for about another month, ostensibly to let the fabric fall. These were the two videos I watched to help me do the hem: Sparkly Belly’s 14 do’s and dont’s and House of Miss Sew How to hem a chiffon bridesmaid dress. Eventually I just sucked it up and went for it. There is actually so much fabric that a slightly uneven hem isn’t that noticeable.

The Result (March 2022)
The bloody dress fits - just! I cannot breathe out and I probably won’t be eating a full three course dinner in it but it is now my favourite fancy dress. The sheer volume of fabric makes it feel so nice on. You really do want to pick a light fabric for this one. I did think at one point you probably could just wear a slip under it instead of sewing the full lining skirt - but again - the lining makes it feel luxurious. I will have photos of the dress on when I wear it to a wedding in April. Its not a casual dress but it is one worth making if you can stomach the volume of fabric you will have to buy and cut.